Welcome! I’m Carolyn Dube – This colorful journey is all about the freedom of play!
Search My Blog
Search by Category
The Fine Print
Some of the links on this blog are affiliate links and I receive a small percentage. It doesn't cost you anything extra and helps keep all the free tutorials and videos coming! It's a win-win!
The website is copyright Carolyn Dube, and that is kinda common sense since this is my site.
As an Amazon Associate I earn from qualifying purchases.
This is like an inner critic with enough family baggage to fill a cruise ship. Over the years, I have tolerated that voice and let it suck so much joy away.
ENOUGH IS ENOUGH. I want to embrace the fun of the season not the stress. Here’s what I have been saying any time I hear that critical voice about my holiday decorations, my wrapping, my cooking, etc.
It is not going to be a masterpiece. It is going to be done.
It is not going to be perfect. It is going to be done.
It is not going into the museum of holiday decorations. It is going into my hallway (or any other room in my house).
This has dramatically shifted my holidays. There is so much more joy in them. And so much more is getting done – like these quick stockings!
In the video, I dressed up some extremely cheap stockings. These had been in the closet waiting for me to add something to them. Well, now I have! Are they perfect? Nope. Are they a masterpiece? Nope. Did I have fun making them? Yup! Will I have fun putting them up around the house? Most definitely!
If you’d like more ways to quiet a critical voice, I’ve got a downloadable video and pdf waiting for you called “3 Ways to Thwart the Inner Critic“. Find the details here.
I’m going traditional with this Santa inspired ornament. Why so traditional? Because I have a Santa themed tree, which happens to be an upside down tree. Can’t be too traditional all at once here.
New the to the upside down tree world? You can read why I love this tree here.
I bought these red ornaments a while back on sale for this tree. I wanted to make a fun red Santa ornament. I let the holiday stress get in the way of my plans, and these went into the closet for “when I had time”. That was several years ago.
At first, I imagined an heirloom Santa ornament that rivaled a Faberge creation. Then I had a moment of sanity and reminded myself that it is not a masterpiece commissioned for a royal family. It’s a cheap red ornament for a tree.
Reminding myself it’s not a masterpiece let me actually start playing and making. Not only do I have some for this tree, I also created enough to take care of an ornament swap I’m in! Bonus!
Check out the video to see how to get the spray to go all around the top without moving your hands and how easy it is to make red ribbon carbon black!
Plain is just so…plain. I had these glass, and easily broken, ornaments that needed a little something added to them..and it had to be quick.
Why quick? Besides my limited patience it is also December so time is even more limited than usual.
I’m using texture spray and Pico embellishers from IMAGINE Crafts/Tsukeniko. These goodies create dimension that stuck extremely well to the ornament and make them fun to touch, once dry of course. Didn’t prep a thing, just started playing and it all stuck!
In the video you’ll see me decorating them and I am very happy that I didn’t break any because I had to rig up a way to decorate them on camera…take a look. It’ll all make sense when you see it.
This website uses cookies to improve your experience while you navigate through the website. Out of these cookies, the cookies that are categorized as necessary are stored on your browser as they are essential for the working of basic functionalities of the website. We also use third-party cookies that help us analyze and understand how you use this website. These cookies will be stored in your browser only with your consent. You also have the option to opt-out of these cookies. But opting out of some of these cookies may have an effect on your browsing experience.
Necessary cookies are absolutely essential for the website to function properly. This category only includes cookies that ensures basic functionalities and security features of the website. These cookies do not store any personal information.
Any cookies that may not be particularly necessary for the website to function and is used specifically to collect user personal data via analytics, ads, other embedded contents are termed as non-necessary cookies. It is mandatory to procure user consent prior to running these cookies on your website.


 This is like an inner critic with enough family baggage to fill a cruise ship. Over the years, I have tolerated that voice and let it suck so much joy away.
 I’m going traditional with this Santa inspired ornament. Why so traditional? Because I have a Santa themed tree, which happens to be an upside down tree. Can’t be too traditional all at once here.
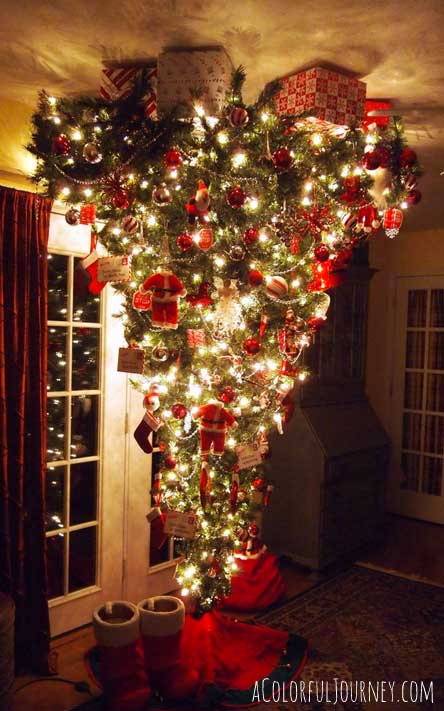 New the to the upside down tree world? You can read why I love this tree
 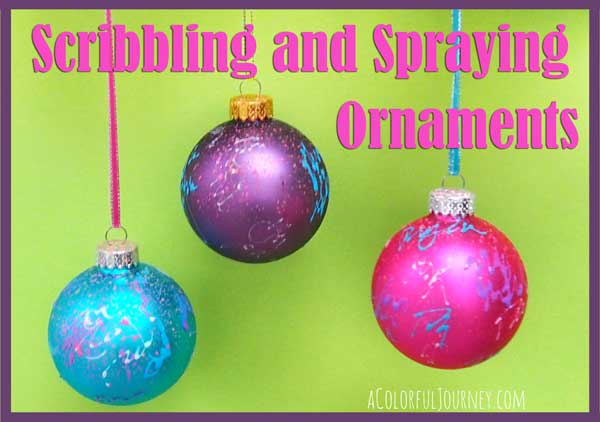 Plain is just so…plain. I had these glass, and easily broken, ornaments that needed a little something added to them..and it had to be quick.