Welcome! I’m Carolyn Dube – This colorful journey is all about the freedom of play!
Search My Blog
Search by Category
The Fine Print
Some of the links on this blog are affiliate links and I receive a small percentage. It doesn't cost you anything extra and helps keep all the free tutorials and videos coming! It's a win-win!
The website is copyright Carolyn Dube, and that is kinda common sense since this is my site.
As an Amazon Associate I earn from qualifying purchases.
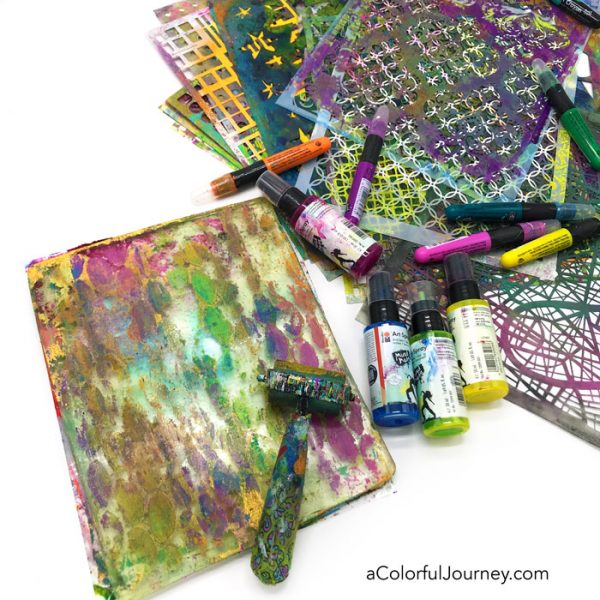
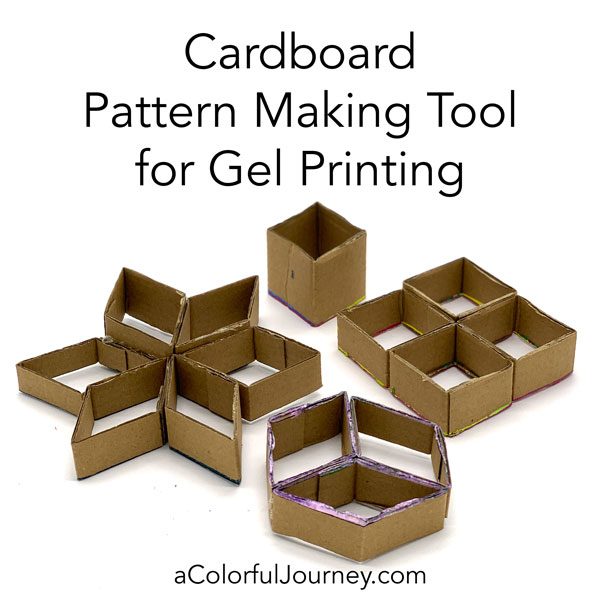
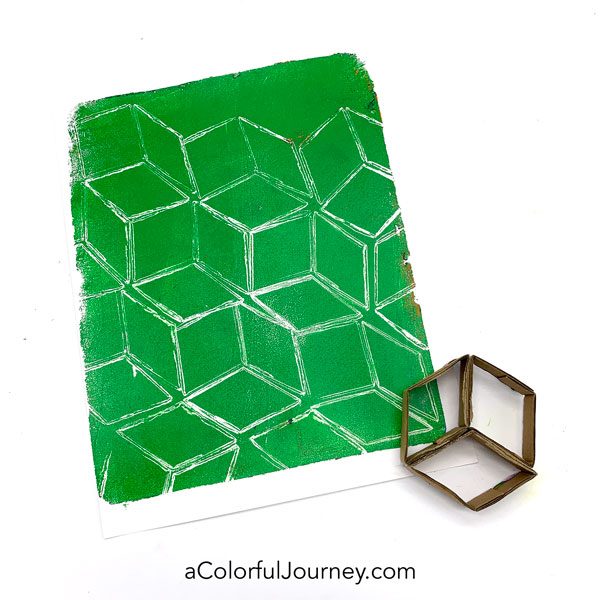
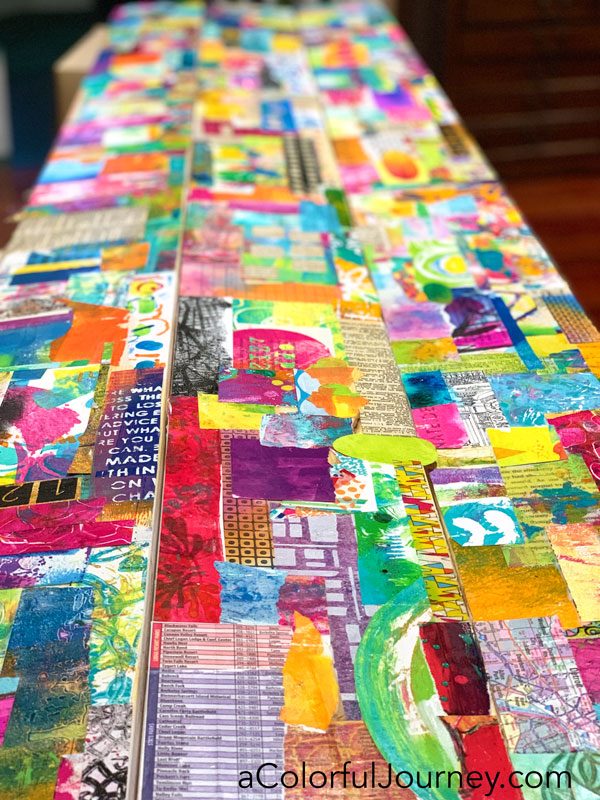
This is just cardboard that would have been recycled and I know I can find more. But it felt like treasure. In the video, you’ll see why it suddenly made me cautious.
Cut a square tube of cardboard into smaller pieces. I found this one as packing material from an online order.
Then attach the shapes together using whatever kind of adhesive you have- glue, gel medium, double-sided tape, an ATG gun or anything else you have handy.
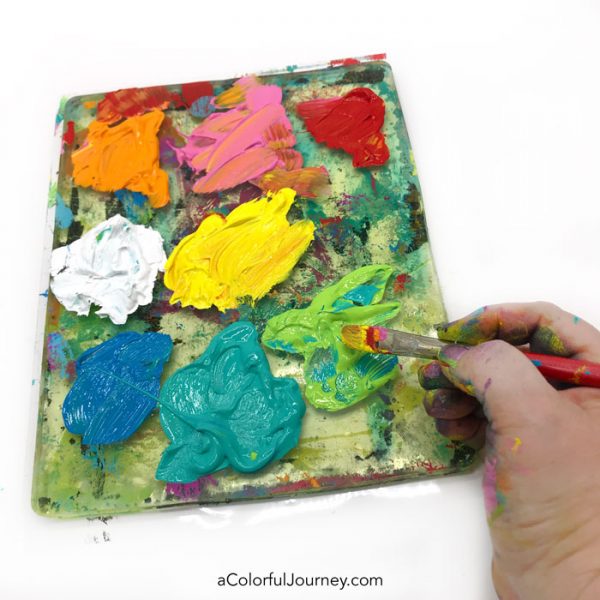
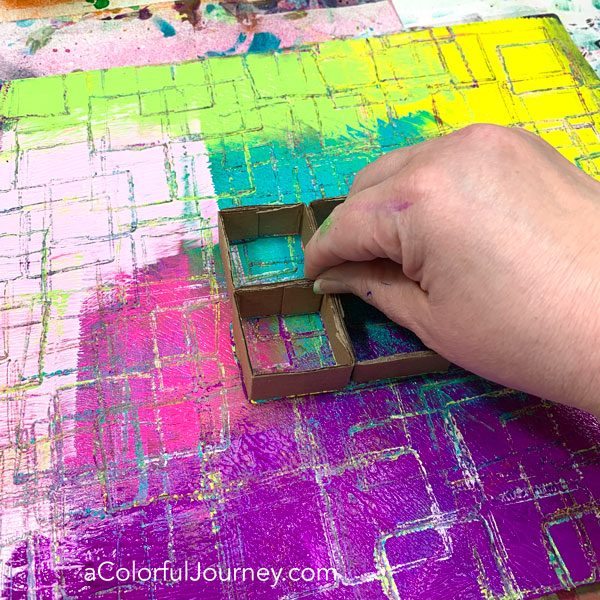
Next, brayer acrylic paint on to the plate. This is a very forgiving process. If you use too little, you just add more.
Then push the cardboard into the paint. Repeat as many times as you want, then put the paper on there to take the pull. Giving it a little wiggle will give you a better impression.
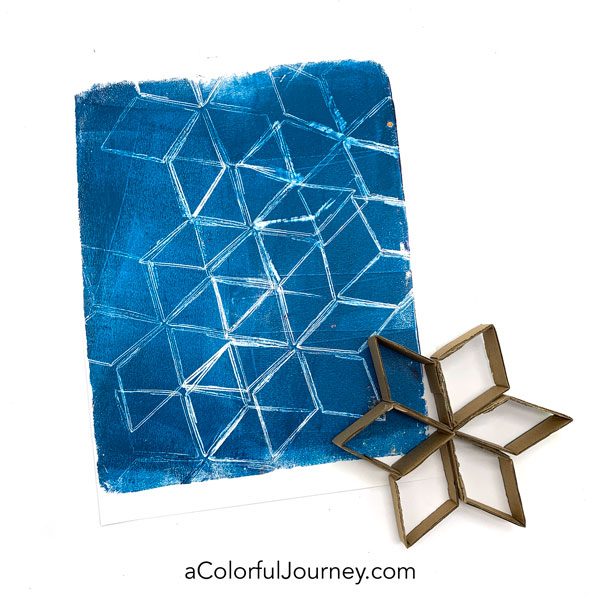
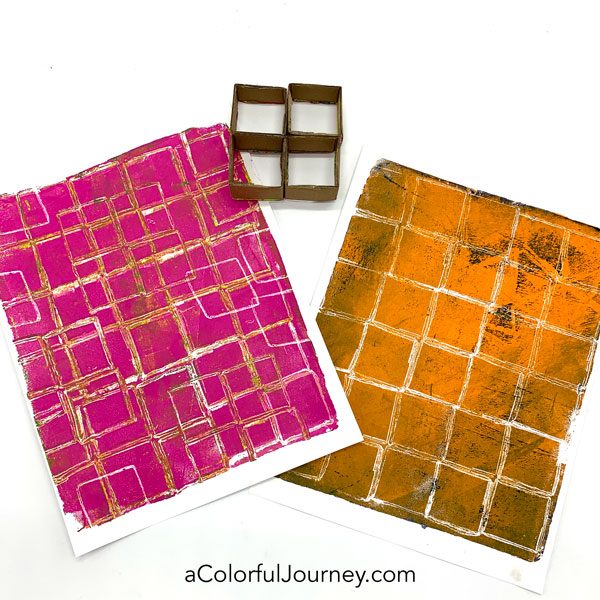
What if you use too much paint? That’s no big deal either. When I put all the colors on the plate, I had more paint than I had to have – I have a lead foot when it comes to squirting out paint.
The only consequence is that I got more prints and more pulls since there was ample paint.
What paper should you use for gel printing? That’s personal preference, since any paper will work from tissue paper to junk mail to cardstock. If you like working with thinner papers, then deli paper or tissue paper may right for you. If you like the feel of cardstock then use that.
I use 90lb cardstock and I have tried several brands – all of which work well. Rather than a brand, I look for the best price on the paper.
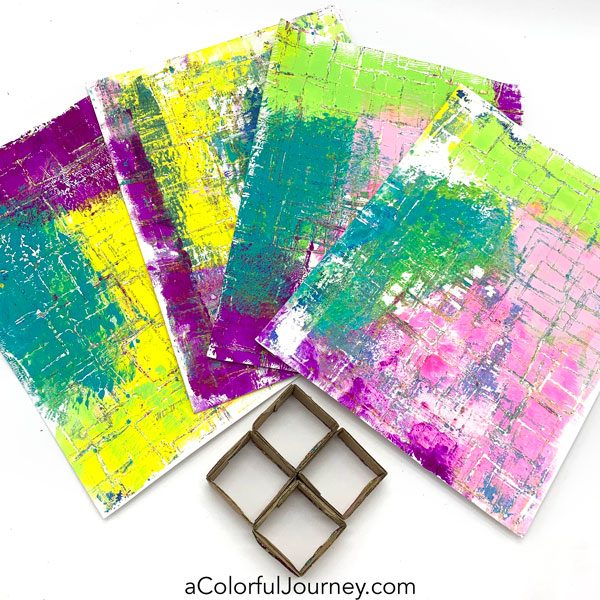
What’s the best paint to use? How to choose the size of the plate? What can you do with all the prints you’ve made?
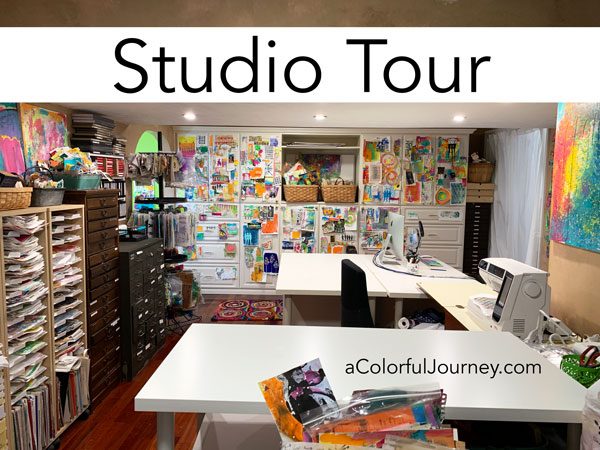
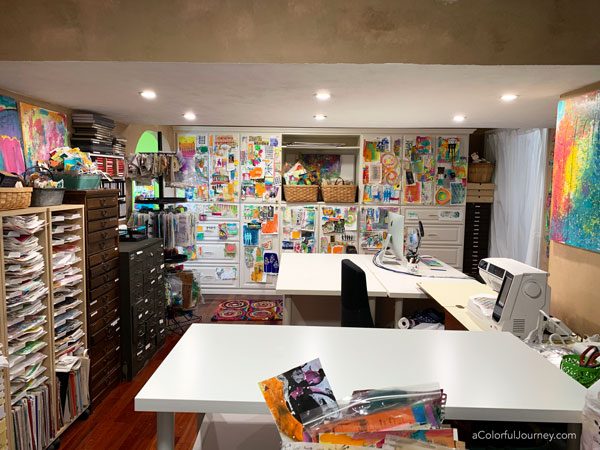
Welcome to my art studio, my play place. As you watch the studio tour, you’ll notice 2 big themes. 1. Keep as much out where you can easily see it. 2. Lumber from the hardware store can do all sorts of things!
Did I always have this much space so that there was a splash zone and a dry zone? Nope. Just like I have evolved and changed, so has my art studio. One thing has been constant, no matter how much space I have, I could always fill more.
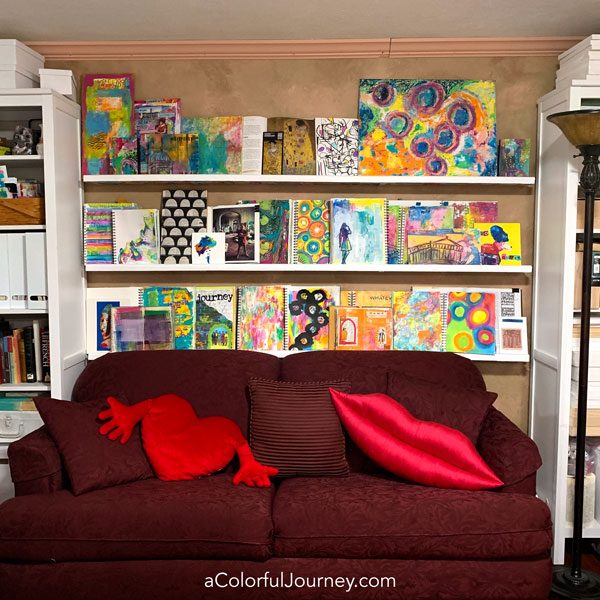
Propped up on these shelves, made from basic hardware store lumber, are books that inspire me at the moment, art journal pages (finished and in progress), canvases, and anything else that calls to me.
When sitting on the sofa, you see the underside of the shelves. So why leave them plain when it’s a chance to use up leftover bits and scraps to add some color.
Did this all go as planned? Nope. I apparently didn’t understand that short people can’t reach as high as tall people. The original plan was to have the shelves about 8 -12 inches higher, bu then I couldn’t reach them easily. O.O.P.S.
As with all Outstanding Opportunities Presenting Suddenly, this one turned out better than planned. Having it right at sofa level makes it so easy to grab what I want off the shelves.
This is the dry zone for things like the die cutting machine, computer, and sewing machine. Since I knew you were coming, I cleaned everything up. Usually, there is a mess everywhere and you can’t see the table tops or even the floor after a day of gel printing.
No matter how big of a space I have, there just isn’t enough so I will use anywhere I can – like the fronts of the cabinets. My favorite bits and pieces get taped up there so I can see what I have and find what I need when I’m creating. Why waste any space.
The cabinets with the skinny little drawers or shelves are by Best Craft Organizer. They have held up extremely well over the years and are a compact way to organize everything from rubber stamps to ephemera to beads.
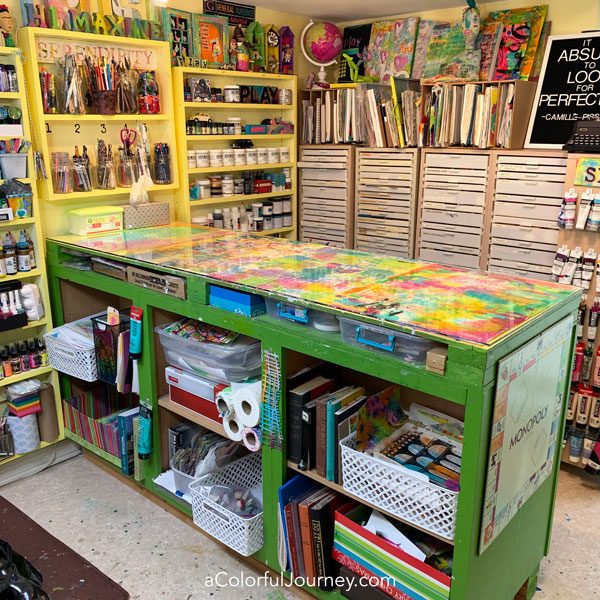
These are cheap unfinished kitchen wall cabinets from the hardware store turned into the counter for the center of the splash zone area of the studio. They had the open shelving that I wanted but were just a little too short.
So, using the ever functional 2 x 4, we raised up the glass on top. If you look closely, you can see 2 of them stacked on the ends and the middle. Nothing fancy but extremely practical.
The glass top is also practical. It is easy to clean no matter what I throw at it and can handle things like cutting with a craft knife directly on it plus you can customize it by putting art underneath it.
Having as much in sight as possible means I am more likely to use it so I lined any wall I could with shallow shelving. These are simply boards from the hardware store cut to fill every inch possible.
When you paint the cheap wood the same color as the walls, they look like so much more than what they are.
To make it easy to store my stencils, I use J hooks. They just go on like a sticker and it is the fastest way I’ve found to store my stencils. You can find them on Amazon or at Uline.
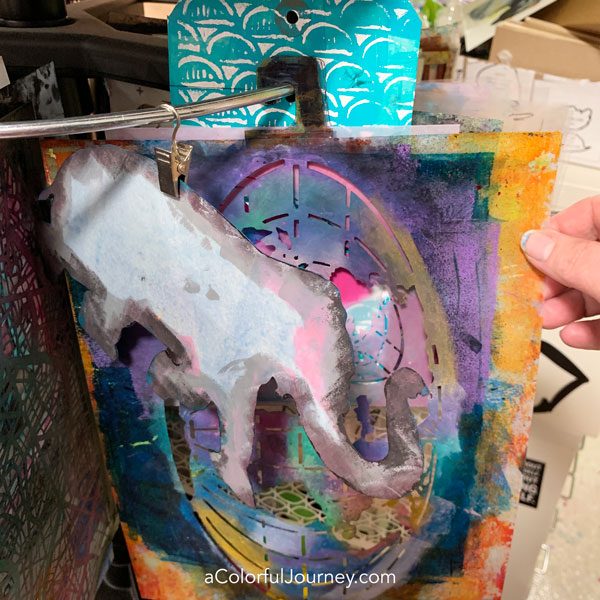
Any spinner rack that I’ve bought, comes with clips- those I use for stencils or masks, like this elephant mask designed by Nat Kalbach.
If you’re looking for stencil storage ideas, check this blog post at StencilGirl Talk. The spinner rack that I have is called a Clip it Up by Simply Renee, but sadly, it is no longer available, but every now and then you can find one on ebay and again, check out that blog post at StencilGirl Talk for lots of creative stencil storage ideas.
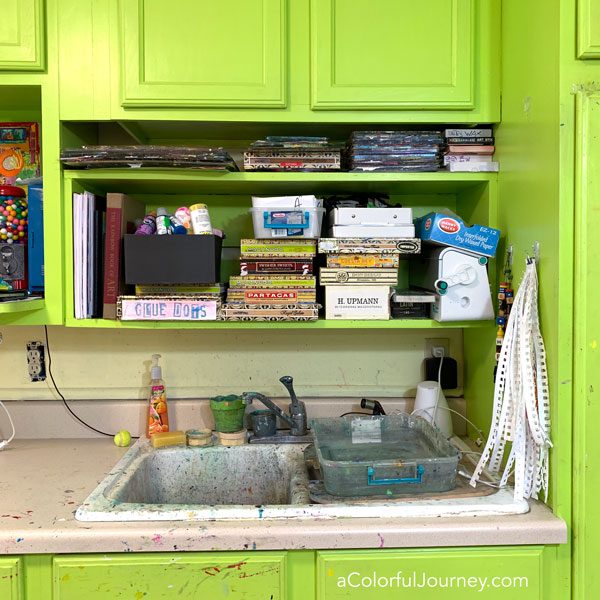
A frequent question I get is how do I store my gel plates. Here they are- on the top shelf. No clam shell packaging, just the protective plastic sheets that come with the plates.
Why do I store them this way? So they are easy to grab and easy to put away. I tend to avoid cleaning so the faster that can go the better. The plates have been stored this way for years now and they have held up just as well as if they were in the clamshells.
I cleaned the tables for you, I cleaned the floor, but not the sink. I just never seem to get around to cleaning that sink. There’s only so much cleaning I can bring myself to do!
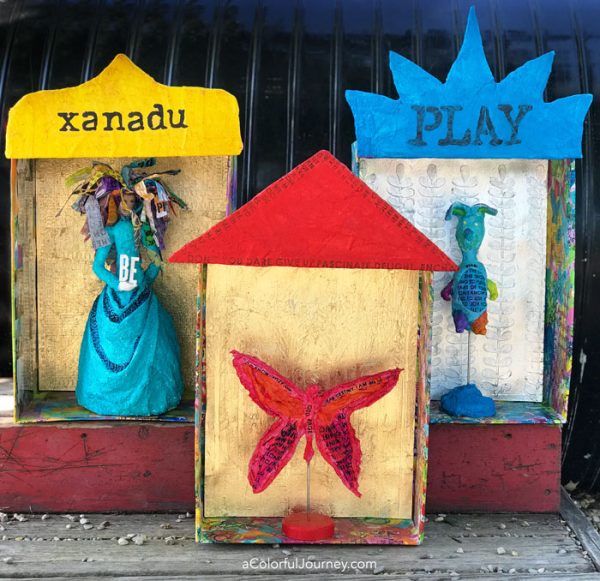
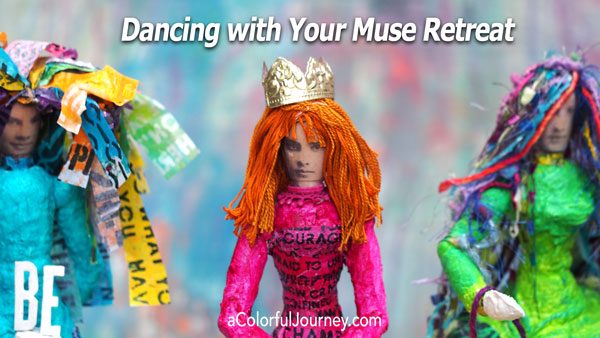
What if you could call upon your creativity any time you wanted? The Dancing with Your Muse retreat is all about play, how to let go and get back in touch with the creativity that flowed effortlessly from you as a child.
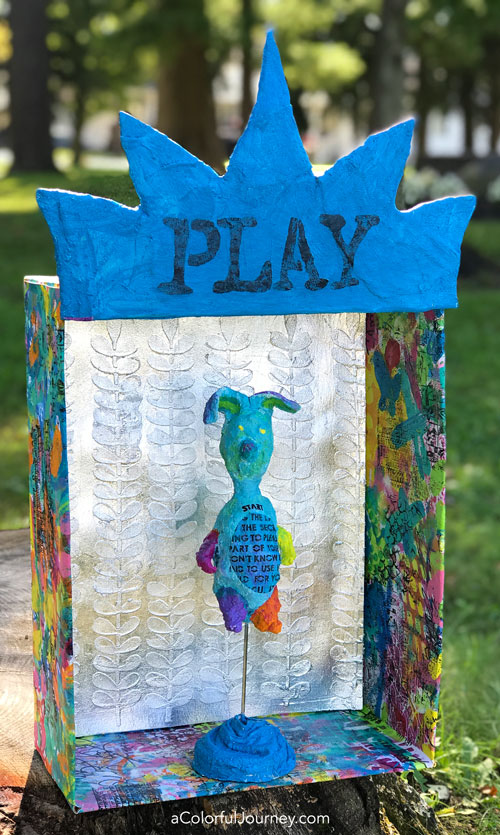
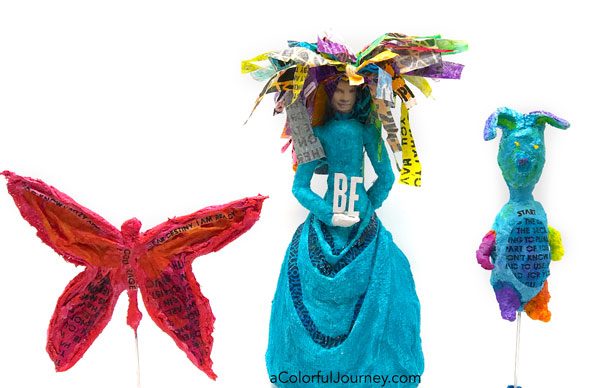
What will we be creating? A mixed media sculpture that symbolizes your muse and a shrine to showcase her.
Join me for a weekend of playing with abandon, letting go of expectations and pure silliness that only a group of wonderful women can have at an art retreat. Well, it’s more than an art retreat but I’ll get to that momentarily.
When you know how to do that, you are dancing with your muse. This retreat is dedicated to giving you the tools, techniques and strategies so you can dance with her and always keep your own creativity flowing.
During our weekend together, the techniques and strategies I share will guide you as you lovingly give shape to the symbol of your muse using mixed media techniques in sculpture and surface design. This involves layering and I’ll be sharing the decision making process for when to layer what and most importantly why so you can apply it to any of your mixed media play.
This is a zero must, zero should zone so that means you can use the materials and techniques in whatever way calls to you. Your muse can be a doll or a butterfly or any symbol of your choosing. You have the freedom to make it your way.
Our weekend together is more than an art retreat, it’s creative immersion. From Friday afternoon to Monday morning, we are together making, playing, talking, connecting with each other and getting to know our muses. We are taking over the entire building August 23- August 26, 2019, so we can paint and play in our pj’s all day long.
The supplies provided for your play include StencilGirl stencils, paints, leafing, rigid wrap, Gel Press gel plates, wire, stamps, Marabu proudcts -Art Crayons, Mousse & Art Spray and so many more goodies for you to incorporate into your shrine. I’m bringing a carload of supplies so your supply list is an itty bitty one!
In your goodie bag, along with an exclusive StencilGirl stencil, that I designed for Dancing with Your Muse, is a creativity and play kit. This kit is filled with treasures that are like catnip to your muse, if your muse was a cat.
All the techniques, tricks, tips, and ways to use the supplies are meant to guide you and allow you the freedom to do it just the way that fits you. This weekend is all about creative freedom.
No experience necessary. Well, there is one prerequisite – to have been a kid at some point in your life. I’m going to go out on a limb here and say you were once a kid, so you’ve got all you need to play and create!
What about the evenings? The evenings will be filled with frivolities that bring laughter and silliness as you get to know your fellow creatives.
Friday night is interactive Painting Bingo, not your usual type of bingo.
Saturday brings out the mirror ball for our Saturday Night Fever Disco Party. We’ll be getting our John Travolta moves on with the help of a very patient and fun professional disco dancing instructor. If you can’t dance, don’t worry, neither can I!
Sunday night it’s Pop Goes the Paint Brush, and it really will go pop!
ALL of this fun is included in your registration.
All of this is included:
Your room with ensuite bathroom (private and doubles available)
All meals and snacks from Friday dinner to Monday breakfast
Art workshops Friday night, all day Saturday, and all day Sunday- zero experience needed for this mixed media play
Exclusive StencilGirl stencil designed by me just for this event
A goodie bag of take home supplies that will keep the playing going for you long after you leave
Supplies for your shrine to your muse including form making supplies, fibers, dresdenized metal, letters, stacks of vintage photos, Art Spray, Mousse and Art Crayons from Marabu, a huge selection of StencilGirl stencils, Gel Press monoprinting plates, glaze, leafing, specialty glues, and more!
Friday night’s interactive Paint Bingo
Saturday Night Fever Disco party
Sunday night’s Pop Goes the Paintbrush
Itty Bitty Supply List for you to bring with you
6-8 colors of acrylic paint you love plus white and black paint
black Sharpie marker
craft knife and cutting mat
double-sided tape
6-8 paint brushes in a variety of sizes
scissors
needle nose pliers and a wire cutter
apron
Your registration price includes the weekend of workshops, a take home goodie bag of play, mountains of supplies including an exclusive StencilGirl stencil for you, your room, meals, snacks, and evening frivolities.
Early Bird saves $95 off of registration but it’s only available until May 31st.
Regular Price $795 single/$755 double Early bird price $700 single room, $655 for a double room
Friday, August 23-Monday, August 26th, 2019
Check in Friday between 3-5pm EST, check out by 11am EST on Monday at St. Mary’s Transfiguration Center 495 Albion Court, Cincinnati, Ohio
Join me for Dancing with your muse, a weekend of play where the stress of the world fades away as you explore, experiment and create.
FAQ
If I’m flying how do I get my muse home? Her shrine doubles as a safe way for her travel. I’ll have bubble wrap to get her tucked in safely for the journey home.
Who is our host?Glenda Miles, the most heart-centered person I have ever met is our event coordinator extraordinaire!
Where is St. Mary’s? It’s in Cincinnati, OH, in the Tri-County area at 495 Albion Court, Cincinnati, Ohio 45666
What is St. Mary’s? St. Mary’s Transfiguration Center is a quiet but active place of peace. It’s spiritual in the soul nurturing way with the most wonderful grounds to wander.
What’s the nearest airport? CVG airport, 36 miles away – ground transportation options
Is this only for women? Yes, it is only for women.
What if I’m new to mixed media? No experience necessary. Truly. Each technique will be broken down in easy to understand steps and I’ll be right there with you to answer any questions that arise.
Can I bring food or drink? Yes, you are welcome to bring any food or beverages you like, including wine. They have 2 full size fridges for us to use, so you can keep your drinks of choice chilled and easily accessible. They’ll have water, tea, and coffee for us but if you’d like other drinks, like sodas, feel free to bring them with you.
I have food allergies – will they be able to work around that? Yes, when you register there will be a place there for you to list any food restrictions. They work very hard to provide tasty, home cooked food for everyone.
What if I’m an introvert and need some quiet time? No problem! St. Mary’s has the most tranquil vibe and lots of places for some quiet time, like curling up with a book in the library. I highly recommend walking the labyrinth or around the beautiful grounds.
I won’t have a car, will that be okay? Once the fun begins on Friday afternoon, you won’t need to leave for a thing until check out Monday morning. If you need transportation from the airport, here are some options.
What do I need to bring? It’s an itty bitty supply list for you! 6-8 colors of acrylic paint you love plus white paint and black, 6-8 paint brushes in a variety of sizes, black Sharpie marker,craft knife and cutting mat, scissors, double sided tape, and needle nose pliers, wire cutter, and an apron.
Can I come by myself? Absolutely, many do! The benefit of such a small group is that we all may come in the door by ourselves, but always leave with friends. This is my dream grown up summer camp full of play and laughter, but with a clean room, good food, and lots of art supplies.
What are we doing in the evenings? We’ve got events for each night, like Painting Bingo, Saturday Night Fever Disco party, and Pop Goes the Paint Brush.
When does it start? Friday, August 23, 2019 check in is from 3-5 and check out is by 11am on Monday, August 26, 2019.
What is the refund policy? There are no refunds for this event due to all the planning, supply purchasing, and logistics that goes into making this an amazing weekend for you. What if you can’t come after you’re registered? If there is a waiting list, Glenda will gladly put you in contact with the first person on the list to coordinate possible arrangements for the sale of your ticket. If a transaction is mutually agreed upon and completed, your spot in the event will be transferred to the other person.
This website uses cookies to improve your experience while you navigate through the website. Out of these cookies, the cookies that are categorized as necessary are stored on your browser as they are essential for the working of basic functionalities of the website. We also use third-party cookies that help us analyze and understand how you use this website. These cookies will be stored in your browser only with your consent. You also have the option to opt-out of these cookies. But opting out of some of these cookies may have an effect on your browsing experience.
Necessary cookies are absolutely essential for the website to function properly. This category only includes cookies that ensures basic functionalities and security features of the website. These cookies do not store any personal information.
Any cookies that may not be particularly necessary for the website to function and is used specifically to collect user personal data via analytics, ads, other embedded contents are termed as non-necessary cookies. It is mandatory to procure user consent prior to running these cookies on your website.


 When you know how to do that, you are dancing with your muse. This retreat is dedicated to giving you the tools, techniques and strategies so you can dance with her and always keep your own creativity flowing.