≡ Menu

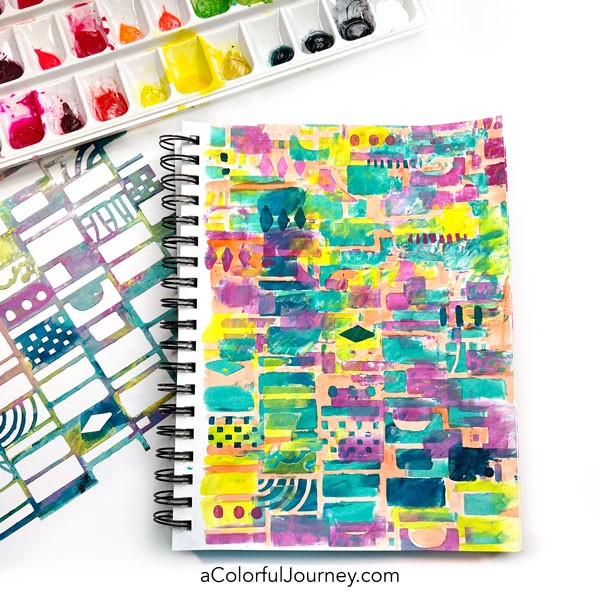
One stencil can create more than one look! In this video, I’m sharing how to create a scalloped look using my Rows of Reflecting Rainbows stencil. Once you know how to build the pattern, you can make it any size you want. Just a couple of rows makes a great border or edging. Fill an entire page to create your own patterned paper.

Add color to the scalloped pattern. Customize it to any color scheme you want. Add one color, two, or the entire rainbow. I used watercolors and you can also use things like colored pencils and pens or anything else you have on hand.

This just one way to use a stencil, the tip of the iceberg. If you’re looking to get more out of your stencils, then check out my online workshop, The Joy of Stenciling.

Here are the supplies used. Some of these links may be affiliate links which means I may get a small percentage and it doesn’t cost you anything extra! And you get a really good feeling knowing that you are helping keep the free tutorials coming!

{ 0 comments }

A question I’ve been asked repeatedly over the years is, “What do you do with it?” The it being an art journal or a stack of gel prints or ATCs. This question can be taken two ways. It can be meant in the spirit of what’s the next step in the process or it can mean what’s the point of making it? The latter is the question that I’m answering here.

There is one big reason why I create and under the umbrella of that are all sorts of little reasons. It’s fun. It brings me joy. Color excites me. It’s a stress reliever. It’s a way to process feelings. It’s a way to meditate. It rush that comes with exploring and experimenting. The list could go on and on.

***You can find all the supplies used at the end of this blog post.***

But the big reason why I create is it lets me be the complete me. The bruised parts, strong parts, the playful parts, the childish parts, the serious parts, they’re all welcome when I’m creating. Could it also be called the true me or the authentic me? Absolutely.

Why do you create?

Why an individual creates is personal – there is no right or wrong answer. So what about you, why do you create?

You may know exactly why you do or you may not. There is no correct answer here. If you’re exploring your creativity, to spark some ideas, I’ve got a list below of reasons why someone creates. I didn’t write these, they’re all courtesy of my fabulously wonderful newsletter readers. Yes, I am biased!

  • Creating is very calming for me
  • It’s been in me since 6 years old when I used to make different clothes for Brenda Starr comics and redo paper dolls. Can’t help it.
  • It makes my heart happy, and feeds my soul!
  • It’s relaxing and I love scrapbooking
  • Pure enjoyment
  • IT IS THE GREAT ESCAPE FROM THIS CRAZY WORLD.
  • It gives me a satisfying feeling when I create.
  • To feel creative
  • It feeds my soul, brings me joy, calms me and turns off my brain (sometimes even relieves my chronic headaches when they spike – for real!)
  • Color makes me happy
  • Because I have an artistic head
  • My biggest reason for creating is that making art for myself is soothing, exciting, and because I can do it. My husband did not want to support me while I worked on my art. So I dreamed of the day I would retire and be an artist. It’s sad that my husband has passed, but am thrilled I am able to create art as my love while I am now retired.
  • To have a mind-body connection
  • Because I am a creator in every aspect of my life (music, electronics, woodworking, dancing, writing)
    Because art was on my bucket list and now I am like a kid in a candy store – I just can’t get enough, I love every single bit of it.
    Because art makes me a happier person and completes me like nothing else has (even though many other things are enjoyable – art fills me with joy just like nature does)
    Because when I am doing art, no matter what aspect I reach a peace and harmony I don’t reach anywhere else
    Because I lose myself and am truly “”present”” I don’t even quite achieve that in meditation – close, but not like I do when I am doing art. Only other place I do that is in the country and reading a good book.
    Because it excites me – each day is a new thing – a new achievement. It is exciting to see what I can do and every new day is a day I can achieve something new
    This is just off the top of my head but I bet if I thought about it over a day I would have pages filled 🙂
  • I don’t really know, it’s just a compulsion to keep learning new things. Sometimes it’s frustrating and very unfulfilling, but other times it’s such a rush to create something delightful or interesting.
  • The biggest reason is because it is a part of me–like my arm is part of my body.
  • Mostly because of the joy and excitement of making things to give and to sell.
  • It makes me happy!!!
  • I enjoy it !
  • Art is my spiritual practice
  • Can’t live without it
  • Fun relaxing way I set aside a little time for myself.
  • To clear my mind when I have too many ideas in my head.
  • Emotional release; it fills my heart with joy
  • I think I am trying to harness my imagination into something tangible
  • It fulfills my need to “play with color.”
  • I paint to control my chronic pain (osteoarthritis and fibromyalgia) and to reduce my stress as I care for my husband who has Alzheimer’s.
  • The urge is sometimes overwhelming & I might explode if it isn’t released
  • I like to make stuff and in the making, I solve problems, think more deeply about other areas of my life, and I am able to consider more points of view while immersed in paint or glue or whatever medium I am working with. I like to make cards and gifts and specialized journals for friends and family. And it’s just fun to paint and spray and smoosh and scribble and wash and overpaint and add this and add some of that and see what happens.
  • “It makes me feel good. I love to look at the work in different stages and I usually enjoy the process. Sometimes I may do something I don’t like but with mixed media process I’ve found that I can always cover up and try something else. It centers my mind on the creative process and helps keep me from dwelling on my problems and I end up with a piece of art I can look at over and over in my journals or individual works. Also I love love love learning (and the buying of new materials) many techniques and can spending hours watching videos and reading technique books then practicing those techniques.
  • It takes me away from the everyday stresses and problem of life and it makes me feel good.
  • I feel it. I feel like I need it. It makes me feel good! I can forget my real life stresses when I am creating. I don’t have to do it “right” or be good at it. It’s fun. I feel accomplished when I create something no matter what it is. I love to use up old supplies I’ve been collecting. It feels good to finally use things. Again, it all FEELS good.
  • For the same reason that I breathe: because I must, or die
  • It brings me joy
  • To stay sane.
  • I’m compelled to!
  • I create to “Celebrate”, to “process” (stuff that’s going on), “Just because”, and ….. mainly because I love it.
  • To keep me sane in this fractured world.
  • Love the process and sense of accomplishment
  • It is fun. It is freeing. It satisfies my curiosity, I love to play what if. What If I try this color with that? What If I use this supply in a different way? I love the process. Product is not necessarily my end goal.
  • To honor and give thanks for the creative spirit within me; to share the beauty I see.
  • I deal with a LOT of stress everyday-creating always relieves some of the stress-when I let myself create!
  • I have an almost physical ache to make something, anything
  • Creating makes me feel original and full of creative talent and most important, it makes me feel joyful!
  • I just feel compelled to create. Always have.
  • It gives me a chance to totally concentrate on something else (the creation I’m working on) and set aside my cares and worries for the time being, and sometimes I actually create something I like that makes me say to myself “I can’t believe I did that–it turned out great” (maybe not the way I envisioned it but even better)! Creating is learning to play again!
  • I have to. I’m driven too. Yet I’m not creative enough to call myself an artist—I have no original thought. I take classes all the time. I need to have my hand held. But nevertheless I’m still driven too. I think it also helps my mental health, it’s like therapy.
  • A lot of torments in me… and I feel much better when they become piece of création.
  • “Because I admire all kinds of art I want to be involved in making it too. There is a zone where your mind and heart and soul goes when you are creating and it is pure peace.
  • To center myself
  • Because the day doesn’t seem right unless I create SOMETHING….even if its only a doodle!

This list could go on and on because so many kind newsletter readers shared their reason for creating, but I think you’ve got a enough here to get you started.

What’s your reason for creating?

Here are the supplies used. Some of these links may be affiliate links which means I may get a small percentage and it doesn’t cost you anything extra! And you get a really good feeling knowing that you are helping keep the free tutorials coming!

{ 3 comments }

Can you use PanPastel on a gel plate? Absolutely! There are things that PanPastel can only do when using it on a gel plate that it could never ever do with paper alone. Understanding how these two supplies interact opens up a whole world of printing possibilities all while sealing in the PanPastels!

The superpower of PanPastel is blending and a gel plate’s superpower is layering. When you understand how these characteristics play and interact with each other, you hold the key to intentionally creating mysterious layers, bold layers, playful layers or any combination of them. Knowledge is power.

I’ve taken everything I’ve figured out playing with PanPastels on the gel plate and put them into a self paced online workshop, Gel Printing with PanPastels. You’ll see each technique step-by-step but this workshop is about more than the how, it’s also about the why.

If you don’t have the how and the why, gel printing can feel extremely random!

When you understand the nuances of blending on a gel plate, you have the ability to create subtle effects within your layers. But that’s not all!

When creating the look of shading, a dark color can very easily overtake an image. To keep that from happening, and create artistic shading, there’s a simple trick for applying the PanPastel to plate.

You Have Options

The versatility of PanPastels and a gel plate gives you options. You can go bold with a technique or you can be more monochromatic. The prints below were created with the same reverse stenciling technique, but one has been rainbowed while the other stayed with black PanPastel.

“Stuff”

As well as using traditional supplies, like gel plates, stencils, stamps and acrylic paint, we’re also using “stuff”. This is a very technical term that applies to things from your kitchen, from the trash, from around the house or garage. Everything used to make the print below is “stuff”. Wait till you see how to use the patterns and textures you have all around you with PanPastels!

Until I started gel printing with them, my PanPastels didn’t get used very often for one big reason. Pastels need to be sealed. But gel printing with them seals in all that color! That means as soon as you take the pull, they are sealed and good to go for art journaling, card making, scrapbooking, collage, or ready for framing! 

Who is this workshop for?

Anyone who wants to have fun making gel prints! Your gel plate can still be in the original packaging because no experience is needed! Every technique is explained step-by-step. No experience needed with PanPastels either!

If you’re an experienced gel printer, working with PanPastels is different than working with paint on a gel plate and that opens up a whole new world of techniques! Understanding how and why these two supplies work together lets you take your prints up to the next level.

What’s Included in the Workshop:

  • 19 lessons
  • Downloadable videos
  • Self-paced – content immediately available
  • Lifetime access
  • 14 day money back guarantee
  • 5 Bonuses! Color Explosions, Printing on Fabric, Grungy Layers, Aged Layers and the video of newbie Dave making PanPastel prints!

$99

My Guarantee

A lot of art workshops don’t offer guarantees. But I do! Why? Because I want you to have the workshop that is right for you and sometimes the only way you can tell that is by watching the workshop.

Try the workshop for 14 days. After watching the videos, you will know how to use PanPastels on a gel plate to make prints. I 100% guarantee it. If you don’t, send me an email, and I’ll gladly give you a full refund. 

Your Bonuses!

Dave, the husband, was talked into doing a live video using PanPastels for the very first time, ever! The recording of these shenanigans and his rainbow pizzas print is just one of your five bonuses! Also included in your bonuses:

  • Colorful Explosions– make the colors of the rainbow pop with incredible vibrancy with this technique! And NO MUD!
  • Aged layers-Creating the look of aged layers using a combination of techniques from the workshop.
  • Soft and Mysterious Layers-See how a ho-hum background in an art journal becomes one filled with mysterious layers!
  • Gel printing on fabric with PanPastel. The fabric is not washable, so that means it is great for art quilts to be hung on a wall, mixed media fabric art, home decor items – basically, any fabric use that won’t involve putting it in a washing machine.

What supplies do you need? The basic supplies used in all the techniques are PanPastel in any colors you like, cosmetic sponges from the drug store, gel plates (the techniques work on any size) and the basic supplies for making a gel print (brayer, acrylic paint, paper). 

We’ll also be using common art supplies such as stencils, rubbers stamps, plus some “stuff” like some trash, and other household goodies to build pattern on the plate. I encourage you to use what you have on hand! In the classroom, I have a detailed video that walks you through your supply options in depth. I strongly encourage you to substitute with any supplies you prefer or have on hand.

Lessons in this Workshop:

  • How PanPastels Work on Gel Plate
  • Cleaning the Gel Plate and Sponges
  • Blending Colors On the Plate
  • The Pounce and Grab
  • How to Avoid Smeared Layers
  • Using White
  • Taking Grunge to the Next Level
  • To Blend or Not to Blend
  • 2 Very Different Looks from the Same Supplies
  • Combining Techniques
  • Removing Color
  • Rainbow Clouds and a Silver Lining
  • Changing the Shape of the Sponge
  • Reverse Stenciling
  • Colorful Reverse Stenciling
  • Creating Vibrant Layers of Color

FAQ

When does the workshop begin?

As soon as you’re registered! This is a self paced workshop.

What is a self paced workshop?

This is a self-paced workshop which means the videos are available for you to watch at your own pace as soon as you’re registered.

How long do I have access to the workshop?

As long as you need since you have lifetime access and all the videos are downloadable.

Can I do this workshop if I am new to gel printing?

Absolutely! Your gel plate can still be in the original packaging because no experience is needed! Every technique is explained step-by-step.

What if I’m already an experienced gel printer? Is this workshop for me?

Absolutely! Working with PanPastels is different than working with paint on a gel plate. That opens up a whole world of techniques that you can’t do with paint alone. Understanding how PanPastels work on a gel plate can take your prints up to the next level.

Do I need to know how to use PanPastels? 

Nope. This is a completely different way of using PanPastels so no experience needed.  

What if I’m new to understanding color?

There’s a Mud Makers Cheat Sheet for you to print out so I’ve got your back!

What supplies do I need?

The basic supplies used in all the techniques are PanPastel in any colors you like, cosmetic sponges from the drug store, gel plates (the techniques work on any size) and the basic supplies for making a gel print (brayer, acrylic paint, paper). 

We’ll also be using common art supplies such as stencils, rubbers stamps, plus some “stuff” like some trash, and other household goodies to build pattern on the plate. I encourage you to use what you have on hand! In the classroom, I have a detailed video that walks you through your supply options in depth.

How long is each video?

On average, the videos are approx. 10-20 minutes long. Each video is carefully edited so you can see the technique step-by-step and have time to play!

Is there a guarantee?

Yes! Try the workshop for 14 days. After watching the videos, you will know how to use PanPastels on a gel plate to make prints. I 100% guarantee it. If you don’t, send me an email, and I’ll gladly give you a full refund. 

A lot of art workshops don’t offer guarantees. But I do! Why? Because I want you to have the workshop that is right for you and sometimes the only way you can tell that is by watching the workshop.

Are the videos downloadable?

Yes!  You can watch them on your computer or mobile devices.

Do the videos have closed captions?

Yes!

Is there lifetime access?

Yes! Since this is a self paced workshop, you can watch it on whatever timetable fits your needs best!

Am I able to ask questions about or get help with my prints?

Absolutely! I am here to answer all of your PanPastel gel printing questions.That’s one of the perks of taking a workshop! You can upload a photo of your prints, post your questions and share your prints inside the classroom.

Have a question about the workshop? Just send me an email and I’ll get you an answer!

$99

What’s Included in the Workshop:

  • 19 lessons
  • Downloadable videos
  • Self-paced – content immediately available
  • Lifetime access
  • 14 day money back guarantee
  • 5 Bonuses! Color Explosions, Printing on Fabric, Grungy Layers, Aged Layers and the video of newbie Dave making PanPastel prints!
{ 0 comments }